Intro
In the last part, we used the instructions covered in Part 2 to construct our first kernel and reached nearly half the performance of the official implementation on the RTX 3090.
In this part, we'll profile our kernel to identify performance bottlenecks, discover that bank conflicts are the main culprit, and implement swizzling to resolve them and achieve a 2x performance improvement.
Kernel 2: Swizzling
Our kernel 1 achieved nearly half the reference performance, but where are we losing the other half? Nsight Compute gives us a clue: bank conflicts.

Bank conflicts serialize what should be parallel memory access. As a result, warps spend the majority of their time waiting for SMEM requests and use ~4x more memory bandwidth - for the same amount of work, we're occupying 93.64% SMEM bandwidth when we should only need ~23.48%.
Nsight Compute Rules
These info popups are generated by Nsight Compute rules. Rules are Python scripts that analyze a kernel profile and point out any performance issues based on a set of metrics.
Nsight Compute comes with a default set of rules, but you can also write your own.
Optional: Verifying Bank Conflicts
Nsight Compute Bank Conflicts
Even though Nsight Compute reports bank conflicts, this might not always be accurate! The profiler rules can be misleading because there's no dedicated hardware counter for bank conflicts .1 To get the real story, we need to look at the
derived__memory_l1_wavefronts_shared_excessivemetric, which equalsmemory_l1_wavefronts_shared - memory_l1_wavefronts_shared_ideal. 2
This metric shows the excess wavefronts needed due to conflicts. If this value is 0, there are no bank conflicts. Each line of SASS assembly has its own value for this metric.
Looking at our kernel's profile, the bank conflict detection wasn't misleading this time:
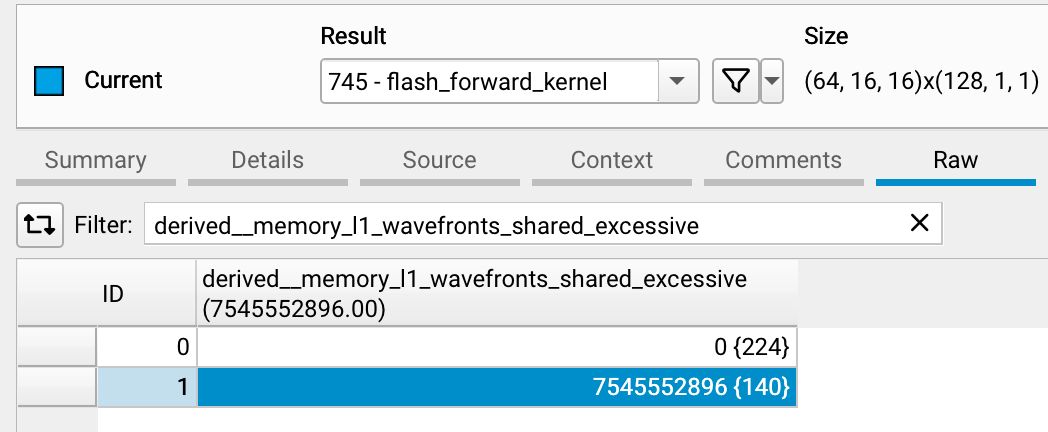
The highlighted line is kernel 1, while the top one is the reference for comparison. The value in curly braces is the # of lines of SASS assembly the metric was captured for.
The metrics that the SMEM conflict rule (shown above) is sourcing from are l1tex__data_bank_conflicts_pipe_lsu_mem_shared_op_ld.sum and l1tex__data_bank_conflicts_pipe_lsu_mem_shared_op_st.sum. I believe these two metrics aggregate the bank conflicts that arise from accessing SMEM and L1 cache at the same time, which can occur because SMEM and L1 cache are unified. While we can't control these L1/SMEM arbitration conflicts, we can eliminate the SMEM-only conflicts through careful memory access patterns like swizzling.
Understanding 16B Vectorized Banks
Vectorized accesses work differently than standard 4B accesses, which affects how bank conflicts occur. With 16B vectorized accesses, we effectively have 8 banks of 16B each instead of the traditional 32 banks of 4B.
Here's why: When a warp executes a 16B LD/ST instruction, the hardware splits this into 4 independent phases, with each phase handled by 8 threads. Since each thread accesses 16 bytes (which spans 4 consecutive 4-byte banks), these 4 banks effectively become a single 16-byte access unit.
| Phase | Threads |
|---|---|
| 0 | 0-7 |
| 1 | 8-15 |
| 2 | 16-23 |
| 3 | 24-31 |
Since each thread in a phase accesses 16 bytes, each phase can access up to 128 bytes. Warp-wide, this sums up to 512 bytes per instruction.
The banking structure changes significantly with 16B accesses. Instead of each thread accessing a single 4-byte bank, each of the 8 threads in a group now accesses 4 banks simultaneously. Since addresses must be 16-byte aligned, this effectively groups 4 consecutive 4-byte banks into a single 16-byte access unit. Rather than working with 32 individual banks, we now effectively have 8 banks that are each 16 bytes wide. For consistency, I'll refer to these 16B wide units as "banks".
Here's what the first phase might look like:

The second phase follows a similar pattern:

This continues for the remaining phases. Now, if two threads in the same group access different addresses in the same bank, this creates a bank conflict across all 4 constituent banks:

However, since each phase acts as its own independent memory access, threads from different groups can access different addresses in the same bank without causing conflicts:

Different phases can experience varying levels of bank conflicts. For instance, one phase might have 2-way conflicts while another experiences 8-way conflicts. Some phases might be conflict-free while others are heavily conflicted. The key insight is that to achieve conflict-free memory access across the entire warp, we only need to ensure that within each group of 8 threads handling a single phase, no bank conflicts occur.
While we've focused on 16B accesses, 8B accesses follow a similar pattern. The key difference is that instead of splitting into 4 phases with 8 threads each, 8B instructions are divided into 2 phases with 16 threads each.
16B Vectorized Banks
- Phase-based execution: 16B accesses split into 4 phases with 8 threads each
- Effective bank structure: 8 banks of 16B each (instead of 32 banks of 4B)
- Conflict conditions: Bank conflicts occur when threads in the same phase access different addresses in the same bank
- Cross-phase freedom: Different phases can access the same bank without conflicts
Bank Conflicts in Our Kernel
Our kernel has conflicts in two places:
SMEM → RF Operations
Here's our first problem. During ldmatrix operations, every thread in a phase accesses the same bank simultaneously, creating 8-way bank conflicts.

RF → SMEM Operations
Our second problem. Each thread copies only 4 bytes per instruction, but threads spaced 4 apart (like 0, 4, 8, 12...) all map to the same bank, creating 8-way conflicts.

GMEM ↔ SMEM Operations
Good news: these transfers are conflict-free. Each row operates as its own phase, and the memory layout ensures threads access different banks.

Bank Conflicts in Our Kernel
- GMEM ↔ SMEM: No conflicts - threads access different banks per phase
- SMEM → RF: 8-way conflicts - all threads in phase access same bank during
ldmatrix- RF → SMEM: 8-way conflicts - threads spaced 4 apart map to same bank
Now that we've identified where conflicts occur, let's understand their performance impact.
Performance Consequences of Bank Conflicts
Memory Utilization
Bank conflicts are a bandwidth hog. Each 8-way conflict serializes what should be parallel access, requiring 8x more wavefronts, which you can think of as number of accesses needed.

As a result, our kernel uses 93.64% SMEM bandwidth utilization compared to 23.48% for an equivalent conflict-free kernel.3
Warp Stalls
On Ampere, warps can potentially be issued an instruction every clock cycle. However, various conditions can prevent a warp from executing an instruction, resulting in a stall cycle. The profiler samples these stall causes periodically every n clock cycles (where n is configurable) and captures the data in the smsp__pcsamp_warps_issue_stalled_* metrics.
These metrics reveal different stall scenarios:
- If a warp successfully gets issued an instruction, the stall cause is recorded as
smsp__pcsamp_warps_issue_stalled_selected - When a warp could receive an instruction but another warp is chosen instead, it's marked as
..._not_selected - Warps waiting for other warps in the CTA at a
__syncthreads()checkpoint generate..._barrierstalls
You can find additional stall causes in the Nsight Compute documentation. Analyzing these stall patterns provides valuable insight into our kernel's bottlenecks.
For our kernel,
| Stall | % of All Stalls |
|---|---|
| short_scoreboard | 56.37% |
| math_pipe_throttle | 11.88% |
| mio_throttle | 11.66% |
| long_scoreboard | 6.31% |
Compared to the reference kernel,
| Stall | Kernel 1 | Reference | Absolute Delta |
|---|---|---|---|
| short_scoreboard | 56.37% | 0.52% | -55.85% |
| mio_throttle | 11.66% | 1.37% | -10.29% |
| long_scoreboard | 6.31% | 0.43% | -5.87% |
Our kernel experiences significantly higher stall rates for short_scoreboard and mio_throttle compared to the reference implementation. I'll explore warp stalls in much greater depth in the final part of this blog series (part 9), but here's a brief overview for now.
The short_scoreboard stalls occur when instructions wait for results from load/store operations to SMEM or other relatively long-latency instructions like exponentiation. This metric excludes GMEM and LMEM operations, which are tracked separately by long_scoreboard. Meanwhile, mio_throttle stalls happen when Ampere's instruction queues for longer operations become full, forcing warps to wait until queue space becomes available.
These metrics reveal that we're spending disproportionately more time waiting for memory transfers to complete compared to the optimized reference implementation.
Now that we've identified bank conflicts as our primary bottleneck and understand their performance impact, let's explore the solution: swizzling.
Swizzling
Swizzling is the standard technique for eliminating bank conflicts in optimized CUDA kernels. The core idea is to redistribute memory accesses so that threads accessing the same row or column hit different physical banks, eliminating serial memory access.
To understand swizzling, let's consider a running toy example where we have a 4x4 matrix in GMEM stored in row major format and we want to transpose it.
- we want to load this to SMEM in row major format, so we'll copy it row by row
- we want to store it back to GMEM in column major format, so we'll write it back column by column
We'll also pretend like our SMEM is banked into a total of 4 banks.
Swizzling maps elements in the same logical column to a unique physical bank by xor'ing the row with the column. We access each element with
arr[row][row XOR col]instead ofarr[row][col]
Note
We have to swizzle our column index (i.e. apply this formula) when we write and read from SMEM.
Without swizzling, our code would look something like this.
__shared__ T smem[4][4];

// Copying row by row from GMEM to SMEM.
int col = threadIdx.x % 4;
for (int row = 0; row < 4; ++row) {
	smem[row][col] = gmem_in[row][col];
}

// Copying col by col from SMEM to GMEM.
int row = threadIdx.x % 4;
for (int col = 0; col < 4; ++col) {
	gmem_out[col][row] = smem[row][col];
}
With swizzling, our code now looks like
// Copying row by row from GMEM to SMEM.
int col = threadIdx.x % 4;
for (int row = 0; row < 4; ++row) {
	int swizzled_col = row ^ col;
	smem[row][swizzled_col] = gmem_in[row][col];
}

// Copying col by col from SMEM to GMEM.
int row = threadIdx.x % 4;
for (int col = 0; col < 4; ++col) {
	int swizzled_col = row ^ col;
	gmem_out[col][row] = smem[row][swizzled_col];
}
Swizzling In Depth
To understand swizzling, we can think about it recursively. This will help us see why the patterns work the way they do. Let's start small and work our way up:
Base case (1×1): With just one element, swizzling doesn't do anything. There's only one way to arrange it.
Case (2×2): We can break this down row by row:
- First row: Just apply our base case to each element
- Second row: Swap positions within the row, then apply the base case to each element
Case (4×4): Think of this as four (2×2) sub-grids arranged in a square:
- First row of sub-grids: Apply the (2×2) pattern to each sub-grid independently
- Second row of sub-grids: Swap the sub-grid locations, then apply the (2×2) pattern to each
What This Looks Like Visually
The XOR pattern creates different swapping behaviors in each row:
Row 0: Column indices stay the same

Row 1: We swap adjacent pairs (0 ↔ 1, 2 ↔ 3).

Rows 2-3: The swap distance jumps to 2, but we still repeat the row 0-1 patterns within each swapped pair.


Column Access Pattern
When we access data column by column, look what happens:

Notice how none of the 4 threads access the same bank when accessing any of the columns? That's exactly what we want for our swizzling function.
Sudoku-Like Mapping
We don't actually need XOR specifically. What we need is a sudoku-like mapping where:
- Each row has unique elements
- Each column has unique elements
In this "sudoku grid," the number in each cell is the logical column, and the column position is the physical column (where it's actually stored).
How to read the mapping:
- Row access: Find the row and read the column indices in order
- Column access: For column c, find where c appears in each row - those positions tell you the physical storage locations
| r\c | 0 | 1 | 2 | 3 |
|---|---|---|---|---|
| 0 | 2 | 3 | 1 | 0 |
| 1 | 0 | 1 | 2 | 3 |
| 2 | 1 | 0 | 3 | 2 |
| 3 | 3 | 2 | 0 | 1 |
This mapping works because if we:
- Pick any column - each element (bank) is unique, so no bank conflicts
- Pick any row - the elements are different, so no data gets overwritten
Any sudoku-like mapping works, but why use XOR? It's fast to compute and doesn't need extra memory.
| r \ c | 0 | 1 | 2 | 3 |
|---|---|---|---|---|
| 0 | 0 | 1 | 2 | 3 |
| 1 | 1 | 0 | 3 | 2 |
| 2 | 2 | 3 | 0 | 1 |
| 3 | 3 | 2 | 1 | 0 |
Vectorized Swizzling
Instead of thinking about each individual bf16/fp16 element, it might be easier to consider our "elements" to have the same size as the banks in SMEM. So instead of loading 8x 16-bit elements, we'll load a single 16-byte element. Cutlass defines a uint128_t type for this purpose.
To load an 8×8 grid of 16-byte elements, apply the same row^col mapping recursively across the 8 banks and 8 rows.
This is the access pattern for columns 1 & 5:

Non-Vectorized Swizzling
The RF → SMEM operations present a unique challenge because they aren't vectorized like our other memory transfers. Unlike the vectorized GMEM ↔ SMEM and SMEM → RF operations that move 16 bytes per thread, RF → SMEM transfers only copy 4 bytes per thread per instruction. However, we still need to maintain the swizzled layout for later SMEM → GMEM operations. How do we handle this?

Recall the fragment layout from How Fragments Are Laid Out Across Threads, where:
- Each group of 4 threads stores a row within a fragment (16 bytes total)
- Within each group, threads have unique column offsets (0, 2, 4, or 6 bytes) but share the same 16B-aligned base address.
What we need to do is to apply swizzling to the shared base address for all threads in a row, then add each thread's individual offset. This approach ensures that SMEM data maintains the swizzled layout required for later operations.
The diagram below illustrates this mapping for the second fragment:

Aside: Hopper
Hopper and later architectures simplify swizzling when copying between:
- GMEM ↔ SMEM: Hopper added built in swizzling functionality in the
cp.async.bulk*PTX instructions. This is available on Hopper, Blackwell HPC and consumer. - SMEM → RF: Hopper and Blackwell HPC have dedicated matrix multiplication instructions -- also with built in swizzling -- that operates directly on SMEM (or TMEM for Blackwell). This forgoes any manual copying.
However, there isn't hardware acceleration for RF → SMEM transfers, so swizzling is still required in this case.
Even though these changes drastically simplify things, understanding how swizzling works is still necessary for using this functionality.
Code Changes
Swizzling Function
Now that we understand the theory behind swizzling and have seen how it works with simple examples, let's look at the actual implementation. Our swizzling function builds on the row XOR col pattern we explored earlier, but with some adjustments for our specific memory access patterns.
#define BANKS_PER_VEC4_ACCESS 8
#define ELEMS_PER_BANK 8

__forceinline__ __device__ constexpr int get_swizzled_col(const int &row, const int &col) {
    // Restrict the swizzled column to the
    // (8, 128) byte region it's in.
    // Not strictly necessary, but we'll need it in later kernels.
    const int region_row = row % BANKS_PER_VEC4_ACCESS;

    // Convert column byte offset to 16B bank index since we have 8 banks of 16B each.
    // This transforms the column coordinate from element space to bank space
    const int bank_col = col / ELEMS_PER_BANK;

    // Preserve the byte offset within each 16B bank for non-vectorized RF→SMEM stores
    // This ensures threads in the same 4-thread group maintain their relative positions
    const int bank_offset = col % ELEMS_PER_BANK;

    // Apply XOR swizzling to distribute consecutive row accesses across different banks
    // Then reconstruct the final column address by scaling back to element space
    return ((region_row ^ bank_col) * ELEMS_PER_BANK) + bank_offset;
}
One critical detail: we must apply swizzling to every SMEM access—both reads and writes. Mixing swizzled and non-swizzled accesses will corrupt our data.
With our swizzling function in place, let's implement it across all our memory operations. The highlighted lines show the changes.
Copying between GMEM & SMEM
template <typename op, /* either GM2SM_async or SM2GM */
          TensorLDSTConfig CFG, typename value_t, typename index_t = int64_t>
__forceinline__ __device__ constexpr void copy_block_GSM(
	value_t *gmem, value_t *smem,
    index_t gmem_seq_stride,
    const int lane_id
) {
		// ...

        #pragma unroll
        for (int c = 0; c < col_fragments_per_row;
             c += col_fragments_per_iter) {
            const int col_fragment = c + thread_col_fragment;
            // Apply swizzling to prevent bank conflicts during later column-wise access in `ldmatrix`.
            const int smem_col = get_swizzled_col(cur_row, col_fragment * COLS_PER_FRAGMENT);

            op()(&gmem[cur_row * gmem_seq_stride +
                       col_fragment * COLS_PER_FRAGMENT],
                 &smem[cur_row * CFG.smem_cols +
                       smem_col]);
        }
    }
}
SMEM → RF
#define ROWS_PER_FRAGMENT 8
#define COLS_PER_FRAGMENT 8
#define ELEMS_PER_VEC4_ACCESS 8
template <TensorLDSTConfig CFG, typename value_t>
__forceinline__ __device__ constexpr void copy_warp_fragment_SM2RF(
uint32_t (®s)[CFG.RF.row_fragments][CFG.RF.col_fragments],
value_t *smem,
const int lane_id,
const int col_fragment_offset = 0
) {
// ...
#pragma unroll
for (int c = 0; c < CFG.RF.col_fragments; c += col_fragments_per_iter) {
const int smem_col_fragment = thread_col_fragment + c + col_fragment_offset;
// Use swizzled addresses to match the layout from GMEM→SMEM transfers
const int smem_col = get_swizzled_col(cur_row, smem_col_fragment * ELEMS_PER_VEC4_ACCESS);
ldmatrix_x4(&smem[cur_row * CFG.smem_cols +
smem_col],
regs[r][c], regs[r + 1][c], regs[r][c + 1],
regs[r + 1][c + 1]);
}
}
}
template <TensorLDSTConfig CFG, typename value_t>
__forceinline__ __device__ constexpr void copy_warp_fragment_transposed_SM2RF(
uint32_t (®s)[CFG.RF.row_fragments][CFG.RF.col_fragments],
value_t *smem,
const int lane_id,
const int row_fragment_offset = 0
) {
// ...
#pragma unroll
for (int c = 0; c < CFG.RF.row_fragments; c += col_fragments_per_iter) {
const int smem_col_fragment = thread_col_fragment + c;
const int smem_col = get_swizzled_col(cur_row, smem_col_fragment * ELEMS_PER_VEC4_ACCESS);
ldmatrix_x4_transpose(
&smem[cur_row * CFG.smem_cols +
smem_col],
regs[c][r], regs[c][r + 1], regs[c + 1][r], regs[c + 1][r + 1]);
}
}
}
RF → SMEM
template <TensorLDSTConfig CFG, typename value_t>
__forceinline__ __device__ constexpr void copy_warp_fragment_RF2SM(
uint32_t (®s)[CFG.RF.row_fragments][CFG.RF.col_fragments],
value_t *smem,
const int lane_id
) {
// ...
#pragma unroll
for (int r = 0; r < CFG.RF.row_fragments; ++r) {
const int cur_row = thread_row + r * rows_per_iter;
#pragma unroll
for (int c = 0; c < CFG.RF.col_fragments; c += col_fragments_per_iter) {
const int smem_col_fragment = c;
// Apply swizzling to maintain consistent layout for later SMEM→GMEM transfers
const int smem_col = get_swizzled_col(cur_row, smem_col_fragment * ELEMS_PER_VEC4_ACCESS + thread_inner_col);
reinterpret_cast<uint32_t *>(
&smem[cur_row * CFG.smem_cols +
smem_col])[0] = regs[r][c];
}
}
}With swizzling implemented across all our memory operations, let's see the performance impact:
Performance Results
The swizzling optimization delivers impressive results: we've doubled our performance from 33.28 → 66.12 TFLOPs, bringing us within striking distance of the reference implementation!

Profile Analysis
Bank Conflicts Eliminated
Perfect! We've eliminated all bank conflicts.
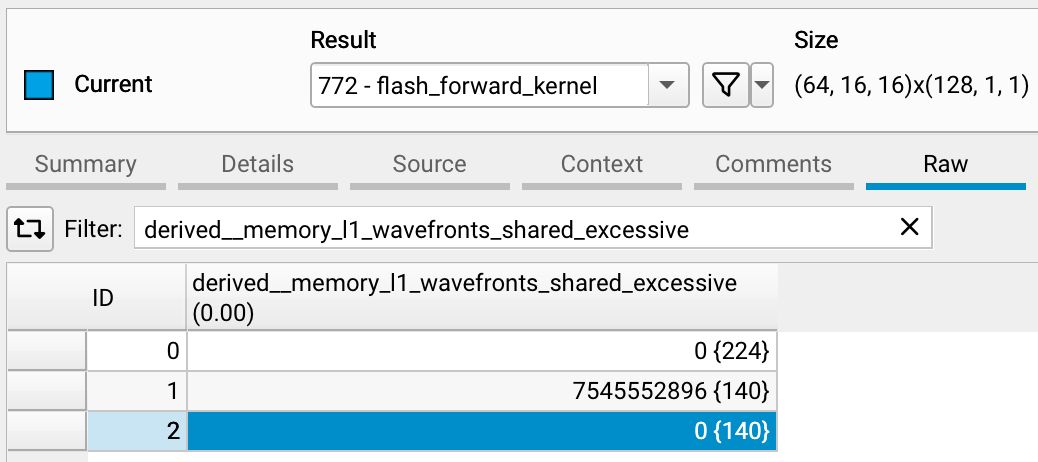
This dramatic improvement reduced the number of wavefronts needed to access the same amount of SMEM by 8x. The 8-way bank conflicts were forcing our memory operations to be serialized, essentially reducing our effective memory bandwidth by 8x. By eliminating these conflicts, we restored the parallel nature of memory accesses, allowing the hardware to operate at its intended throughput and freeing up cycles for actual computation.

Kernel 2 Warp Stalls
If we take a look at the changes in where the warps executing our kernel are stalling, we see huge improvements!
| Stall | Kernel 1 | Kernel 2 | Delta (1→2) | Reference |
|---|---|---|---|---|
| short_scoreboard | 56.37% | 1.49% | -54.88% | 0.52% |
| mio_throttle | 11.66% | 0.74% | -10.92% | 1.37% |
| long_scoreboard | 6.31% | 15.15% | +8.84% | 0.43% |
However, proportionally, warps are stalling more than we'd like while waiting for GMEM requests. 15.15% of warp stalls are due to long_scoreboard, compared to 0.43% of the reference. Swizzling most likely didn't cause this increase, but instead made it more prominent. Reducing these stalls will help us close the remaining gap in performance.
Up Next
We made a massive stride in performance with just a single change -- swizzling -- which brought us remarkably close to the reference implementation. In the next part, we'll implement standard Cutlass techniques, which will help us overlap computation with memory transfers for higher sustained throughput.
Footnotes
-
According to this post on the NVIDIA Developer Forums ↩
-
The
_sharedsuffix here refers to SMEM. ↩ -
This is the
l1tex__data_pipe_lsu_wavefronts_mem_shared_op_ld.sum.pct_of_peak_sustained_elapsedmetric. ↩